A Free Photoshop Script That Batch Changes Background Colors
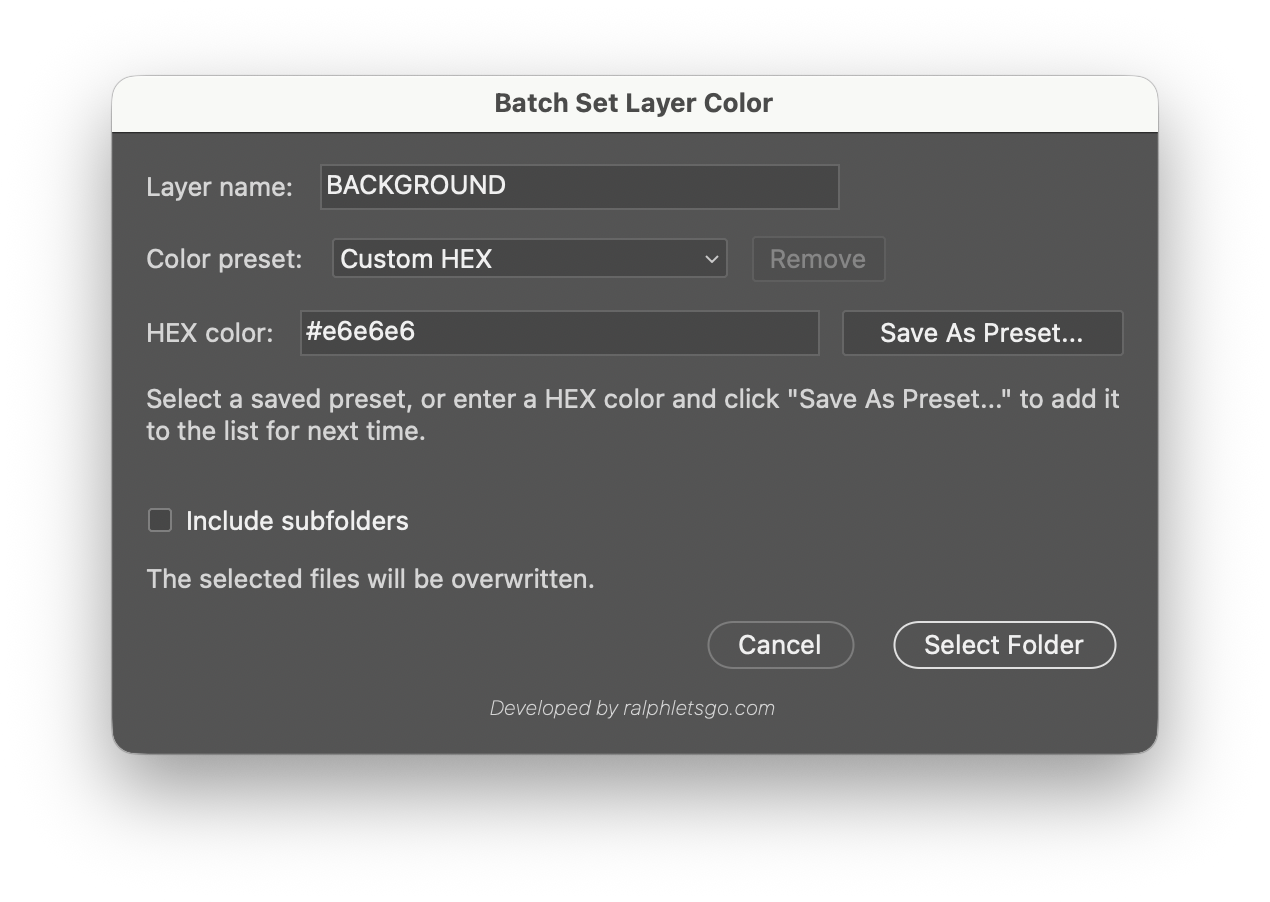
I built this because I regularly need to change the background color on a lot of Photoshop files at once — not one or two, but whole folders of them, all to the same exact HEX value.
Doing that by hand is the same clicks on every single file: open it, find the background layer, unlock it, fill it, save, close. On a few hundred files that’s most of an afternoon. And if you lose focus and skip one, the set isn’t consistent anymore — which was the entire point of the exercise.
So I made a script that does the whole folder in one run, and writes a log afterwards telling me exactly what it changed and which files it couldn’t.
Vibe coded with Claude. It’s free — download link is further down.
What It Does
Batch Set Layer Color is a Photoshop script (.jsx). You give it three things — a folder, a layer name, and a HEX color. It then opens every supported file in that folder, finds the layer with that name, changes it to your color, saves the file, and closes it.
It handles the two layer types you actually run into. If the layer is a Solid Color Fill, it changes the fill color non-destructively — the layer stays a fill layer and stays editable. If it’s a normal pixel layer, it fills the whole layer with the color instead. You don’t have to know which kind you have; the script checks each file and picks the right approach.
The One Rule: Every File Needs the Same Layer Name
This is the part to get right before you run anything, because everything depends on it.
The script finds layers by name, and it changes whatever name you give it.
If your background layer is called BACKGROUND, you type BACKGROUND into the Layer name field — and every BACKGROUND layer in the folder gets set to your HEX color. If yours are called BG instead, type BG and it does the same thing for those. The name isn’t fixed; BACKGROUND is just the default because that’s what I use. Whatever you put in that field is what gets recolored across the whole batch.
The requirement is that the name is consistent across your files. The script looks for one name per run, so all the files you’re processing need to use it.
If one file calls it BACKGROUND, another calls it BG, and a third has Background copy left over from a duplicate, only the files matching what you typed get changed. The rest are skipped — not damaged, not half-edited. The script closes them untouched and writes a MISSING LAYER line into the log.
Two things it’s relaxed about:
- Capitalization doesn’t matter.
BACKGROUND,Backgroundandbackgroundall match. - Nesting doesn’t matter. The layer can sit inside a layer group, or a group inside a group — the script searches all the way down.
It’s only the actual spelling that has to line up. So if your set isn’t consistently named yet, that’s the one bit of prep worth doing first.
And if you’re not sure whether it is consistent — just run it. The log tells you.
Features
- Batch processing — every PSD, PSB, TIF and TIFF in the folder, in one run
- Finds layers by name — case-insensitive, so
BACKGROUND,Backgroundandbackgroundall match - Searches inside groups — the layer doesn’t have to sit at the top level; nested layer groups are searched recursively
- Two layer types handled — Solid Color Fill layers change non-destructively, pixel layers get filled
- Unlocks locked layers — background layers, fully locked layers, and pixel/position/transparency locks are cleared automatically
- Saved color presets — store the HEX values you use constantly and pick them from a dropdown next time
- Custom HEX — accepts 3-digit or 6-digit HEX, with or without the
# - Optional subfolder search — process one folder, or the whole tree beneath it
- Ignores junk files — hidden files, macOS
._sidecars,~$temp files,.DS_Storeand zero-byte files are skipped - Detailed log file — a timestamped
.txtwritten into the folder you selected - Per-folder breakdown — the log separates problems from successful files, folder by folder
The Log File Does the Checking For You
This is the part that makes it usable on real jobs, and it’s the answer to the naming problem above. Every run writes a timestamped text file into the folder you picked, organized so you can find trouble without reading the whole thing.
Each folder gets its own section, and inside that section problems are listed first, before the successes. A file lands in one of four states:
| Status | Meaning |
|---|---|
| SUCCESS | Layer found, recolored, file saved |
| MISSING LAYER | No layer with that name in this file |
| SKIPPED | File couldn’t be found or read |
| FAILED | Something went wrong — the reason is written out |
MISSING LAYER is the one to watch, because that’s your naming inconsistency showing up by filename. You don’t have to audit anything in advance — run the script, then open the log and look at that list. Those are the files where the layer is called something else.
That turns a tedious problem into a two-step routine: run it, fix the handful the log flagged, run it again. If 300 files go in and 4 come back as MISSING LAYER, you know exactly which 4 to open — instead of clicking through all 300 hunting for the odd ones out.
The log also records what it actually did to each successful file — the layer name, whether it was a Solid Color Fill or a pixel layer, and the exact HEX applied — so you have a record of the change afterwards.
Supported Files
| Format | Extensions |
|---|---|
| Photoshop | .psd |
| Large Document | .psb |
| TIFF | .tif, .tiff |
Requirements
Built and tested in Adobe Photoshop 2025 (version 26.11) on macOS.
It’s an ExtendScript (.jsx) file, which is Photoshop’s long-standing scripting format — the same one Adobe has shipped since the CS era. Nothing in the script uses anything recent, so it should run on older versions back to CS6, and on Windows too. I just haven’t tested those myself, so treat that as “should work” rather than a promise.
No plugins, no extensions, no extra installs. Photoshop runs .jsx files natively.
Worth knowing long-term: Adobe is gradually moving scripting to UXP, and ExtendScript is now the legacy option. It still works in current Photoshop and there’s no announced removal date, but a future version will probably drop it eventually.
Before You Run It
The script saves over your original files. There’s no “export to a new folder” option — it opens each file, changes it, and saves in place. That’s deliberate, since the point is updating an existing set of finished files. But it means you want a backup before pointing it at a few hundred PSDs.
Run it on a folder with two or three test files first and check the result. Once you’ve confirmed the layer name and the color are right, let it loose on the full set.
Download
Download Batch Set Layer Color
Free to use. If you run into a problem or want it to do something it doesn’t, write me a message on the contact page.
Installation
You can run the script two ways.
Quick — run it once:
In Photoshop, go to File → Scripts → Browse…, pick the .jsx file, and it runs immediately. Nothing gets installed.
Permanent — add it to the Scripts menu:
Put the .jsx file in Photoshop’s Scripts folder, then restart Photoshop. It’ll show up under File → Scripts with your other scripts.
On macOS:
/Applications/Adobe Photoshop <version>/Presets/Scripts/On Windows:
C:\Program Files\Adobe\Adobe Photoshop <version>\Presets\Scripts\How to Use It
- Open one of your files and check what the background layer is actually called. That exact name is what you’ll type in step 3.
- In Photoshop, go to File → Scripts → Batch Set Layer Color
- Type the layer name into the first field —
BACKGROUNDis the default - Pick a saved preset, or choose Custom HEX and type your own color
- Tick Include subfolders if you want the whole folder tree, not just the top level
- Click Select Folder and choose the folder
- Wait. Photoshop opens and closes each file as it works — don’t touch it while it runs
- You’ll get a summary when it finishes. Open the log file in the folder you selected and check the MISSING LAYER list
- If anything is listed there, rename the layer in those files and run the script again on the same folder
Steps 8 and 9 are the routine. The first run does the bulk of the work and tells you what it couldn’t handle; the second run mops up. Files that already have the right color don’t mind being processed twice.